Quick Bite: Managing uploaded images

Erudus is a powerful data platform with a range of business-improving tools and solutions, and though we’ve made it as user-friendly as possible, we know it’s important to have a resource for our customers to get answers to their questions and learn how to use Erudus to it’s full advantage. Enter Knowledge Base, the user manual in which you can learn everything you’ll conceivably ever need to know about using Erudus.
So far we’ve covered:
- Logging into Erudus for the first time
- How to reset your password
- Adding a product
- Adding a local code to a product
- Amending or editing a product
- Managing your Erudus email subscriptions
- Removing a product
- Confirming your product data
- Manufacturer Product Tour
- Interpreting CSV downloads
- Updating your Supplier profile details
- Creating a Product Visibility Report
- Uploading a Range List to Match Local Codes to Products
- Adding an Internal or Customer User to Your Wholesaler Account
- Copying a Product Specification
- Uploading images to Image Hub
This time we're turning our attention to “Managing uploaded images”.
Step 1
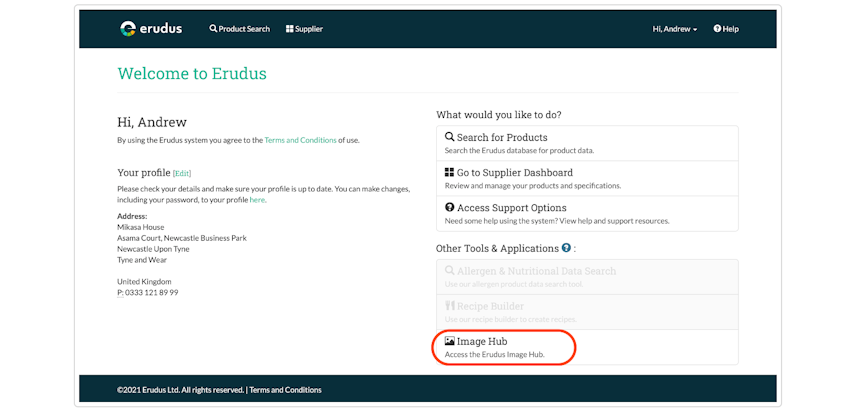
Click on the Image Hub Button on the user dashboard.
Step 2
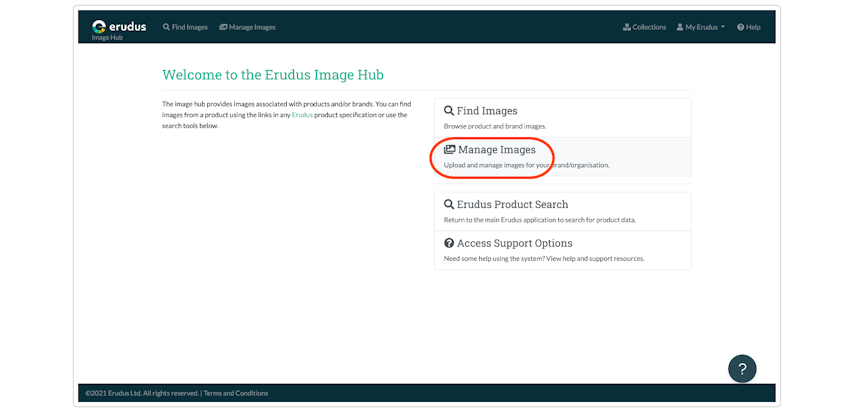
From the Image Hub dashboard, click the "Manage Images" button.
Step 3
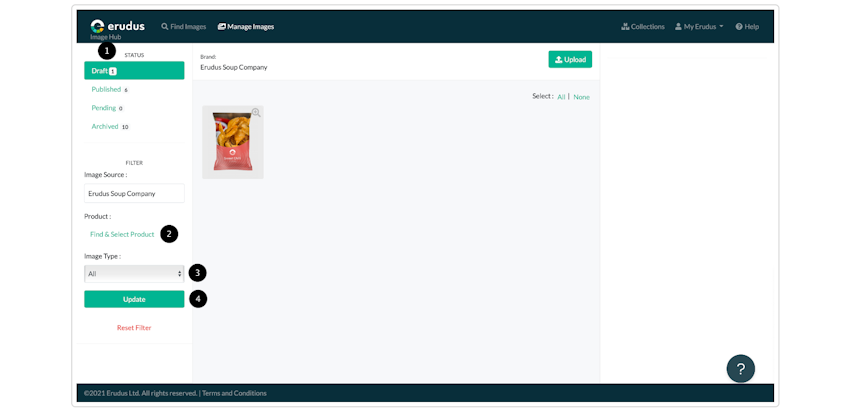
You will be taken to the image management dashboard. From there you can use the left sidebar to find the image you need. The status filters (1) will show you images by their current status in Image Hub:
- "Draft" will show uploaded images that haven't been published to Image Hub.
- "Published" will show images published to Image Hub that have passed validation from the Erudus Support team.
- "Pending" will show images you have requested for publication that are still awaiting validation from the Erudus Support team.
- "Archived" will show images that you have removed after they have been published.
You can use the "Find & Select Product" button (2) to look for images associated with a specific product.
The "Image Type" filter (3) will allow you to filter images using one of 10 categorisations available including; pack shots, lifestyle shots and logos.
After you have selected the filters you wish to apply, remember to click the "Update" button (4) for the filters to take effect.
Step 4
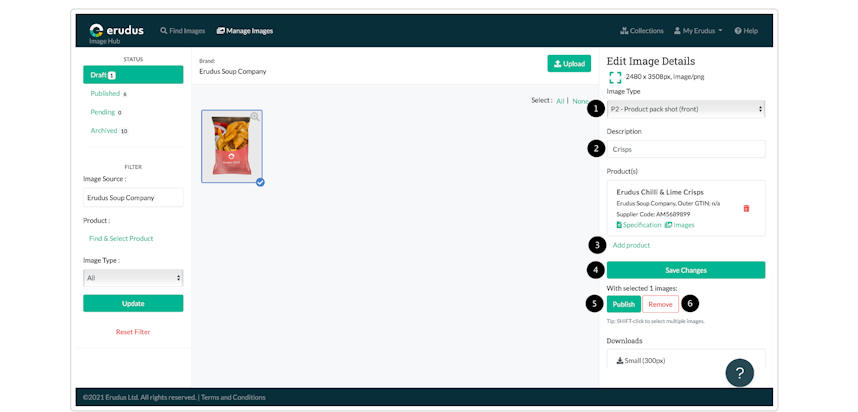
Once you have found the image you wish to manage, click on it and the right sidebar will populate with the image details that you can edit.
You can assign an image an image type using the "Image Type" dropdown menu (1) to help users filter your images when they are published.
You can enter a description of the image in the "Description" text box (2).
You can assign the image to a product specification that you have published to the Erudus database (3). You can assign the same image to multiple products.
When you have entered all the information for the image, you can save that information using the "Save Changes" button (5).
When you are ready to publish the image to Image Hub, click the blue "Publish" button (5). This will send the image to our Support team for validation before it goes live.
If you wish to remove an image you have uploaded from the Image hub, click the "Remove" button (6).
Note: Removing a published image will move it to the "Archived" section and removing a draft will remove it from the Image Hub entirely
You may also be interested in…


You may also be interested in…
Quick Bite: Uploading images to Image Hub
ReadYou may also be interested in…


You may also be interested in…
Quick Bite: Copying a Product Specification
ReadYou may also be interested in…


You may also be interested in…

